Printer's Plan version 2022 Release Notes Follow
Table of Contents
- Credit Card Processing Fee/Surcharge
- Copy and Paste Quote Alert
- Print the Amount Due at the top of the Invoice
- Print a Payment Receipt from the Accounts Receivable Section
- SAGE Integration
- ASI Integration
- New Report: Customer by Month and Year to Date
- Set Security Level on Start
- Store Multiple Credit Cards on File per Contact
- Payment Processing: Integrated Cloud Terminal
- Updated Payment Details Window
- New Icon to Indicate Card on File
- Preset Payment Method (ACH or Credit Card) on the Hosted Payment Page
- Shipping Integration Enhancements
- Fixes and Improvements
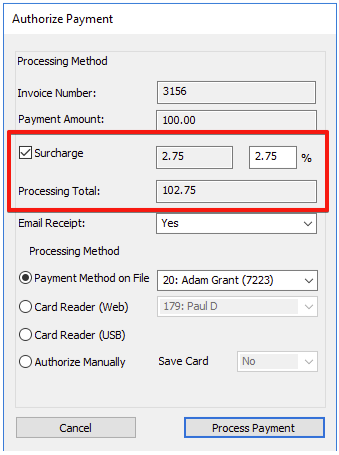
1. Credit Card Processing Fee/Surcharge
As part of the 2022 update, when processing payments using Print Reach Pay, you now have the option to include a Credit Card Processing Fee (Surcharge).
This fee will be added to the payment amount and is designed to help offset transaction fees. For a comprehensive explanation of how to enable this feature please review the following Knowledge Base article:Print Reach Pay Processing Fee/Surcharge
To use this feature you will need a Print Reach Pay merchant account. For information about obtaining this account please visit the following link: https://printreach.com/printersplan-printreachpay or contact us at (888) 581-3100.
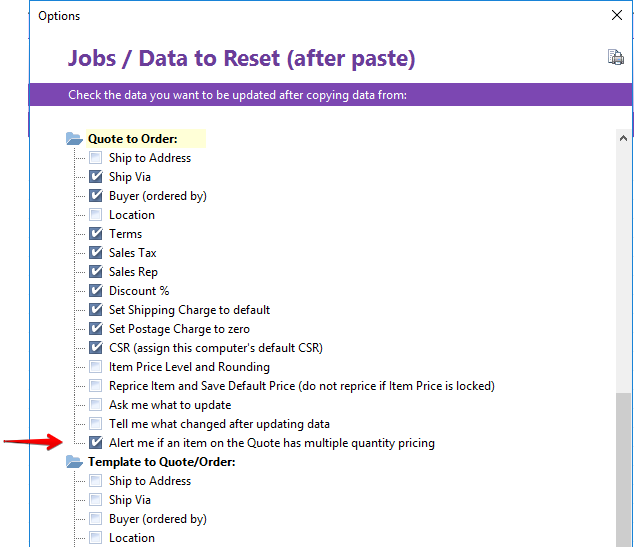
2. Copy and Paste Quote Alert
When pasting a quote as a new order, Printer’s Plan can provide an alert if an item on the quote has multiple quantity pricing. To enable this option, navigate to the Settings section, open the Jobs folder and select Data to Reset (after paste). In the window that appears, under the Quote to Order folder, select Alert me if an item on the Quote has multiple quantity pricing:
When this option is enabled, if you copy a quote that includes an item with multiple quantity pricing the following window will appear:
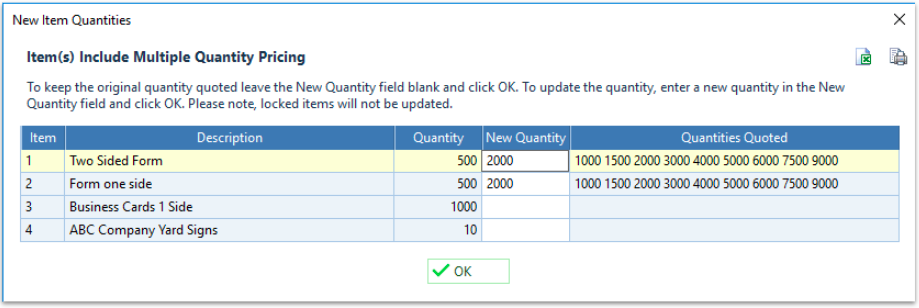
In this window, to keep the original quantity quoted leave the New Quantity field blank and click OK. To update the quantity, enter a new quantity in the New Quantity field and click OK. This will create the item on the order with the updated quantity and price. Items that are locked will not be updated.
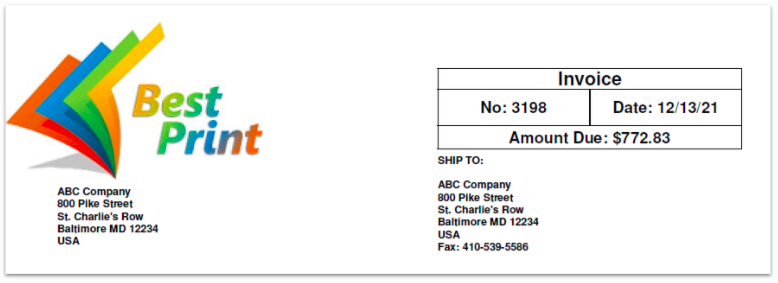
3. Print the Amount Due at the top of the Invoice
When printing an invoice there is a new print option called Amount Due.
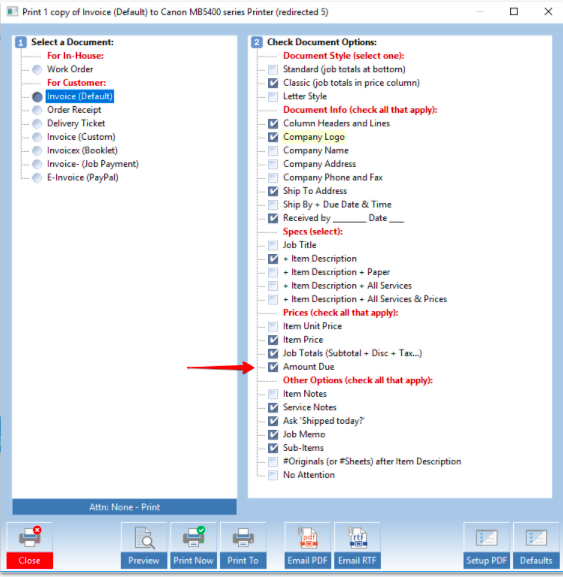
When this option is selected, the total amount due will print at the top of the invoice:
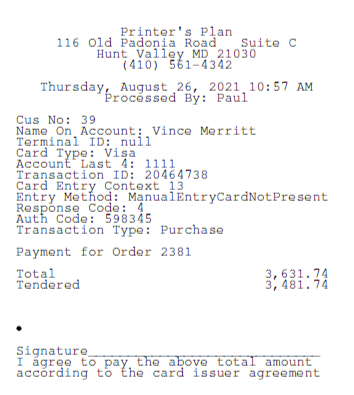
4. Print a Payment Receipt from the Accounts Receivable Section
In prior versions of Printer’s Plan there wasn’t a way to print a payment receipt for payments made in the A/R section of the program. Additionally, for Deposit and Quick Sale payments there wasn’t a way to reprint the payment receipt for these transactions. This functionality has been added to the 2022 version of the program.
To Print/Reprint a receipt navigate to the A/R section of the program, open the Payments Received folder and select one of the list options (or click the Find button) to find the payment.

Highlight the payment and click on the Print button. In the Print dialog window that appears there is a new Receipt option:

Select the Receipt option and click one of the Print buttons to print a receipt for the payment.
5. SAGE Integration
Sales Orders and Invoices generated from SAGE can now be automatically added to Printer's Plan. For information about this integration please review the following Knowledge Base article: SAGE Integration Guide
6. ASI Integration
Sales Orders and Invoices generated from ASI can now be automatically added to Printer's Plan. For information about this integration please review the following Knowledge Base article: ASI Integration Guide
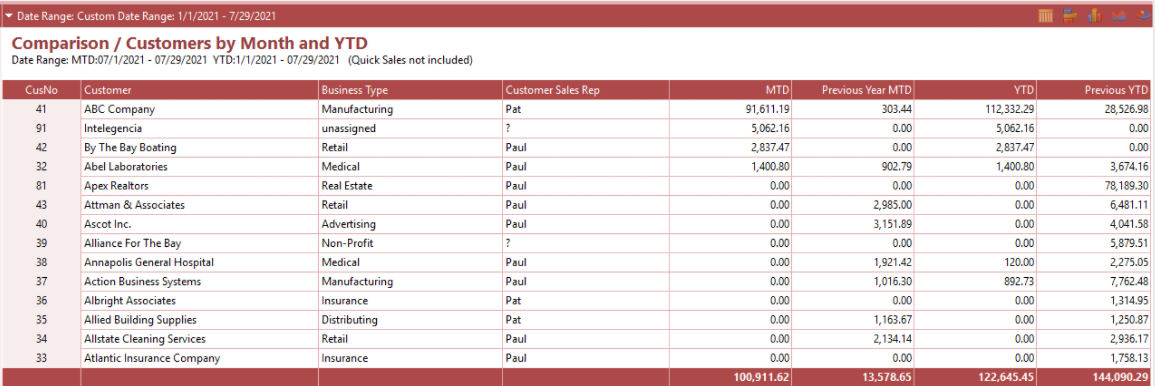
7. New Report: Customer by Month and Year to Date
In the Reports section, under the Comparison folder there is a new report labeled Customers by Month and YTD. When selecting this report the program will display the month and year to date sales for each customer. The report will also show the previous year’s month and year to date sales.
You can alter the time period of the report by clicking the Date Range menu option. When selecting a date range the report will use the second date in this range as the criteria for the filter. For example, if you enter a date range of 7/15/2021 to 7/29/2021, the report will use the 7/29/2021 date as part of the filter. This means the month to date time period will be 7/1/2021 to 7/29/2021, and the year to date range will be 1/1/2021 to 7/29/2021:
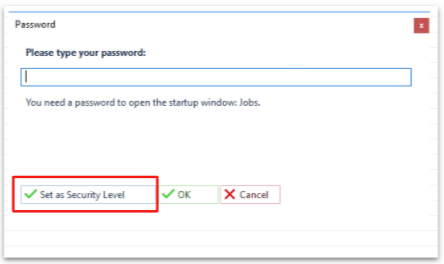
8. Set Security Level on Start
When launching Printer’s Plan, if the default tab was password protected the Printer’s Plan Password window did not include the option to save the security level. This feature has been improved and the Password window now includes the option to save the security level.
Earlier Version:
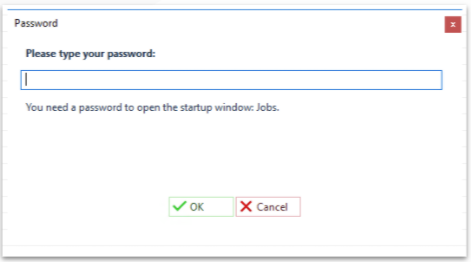
2022 Version:
9. Store Multiple Credit Cards on File per Contact
In prior versions of Printer’s Plan only a single credit card could be stored on file for a contact. In the 2022 update, you can store multiple cards on file for each contact.
In the properties window of a contact, under the Default Payment Method on File section there is a Add/Edit Payment Methods button:
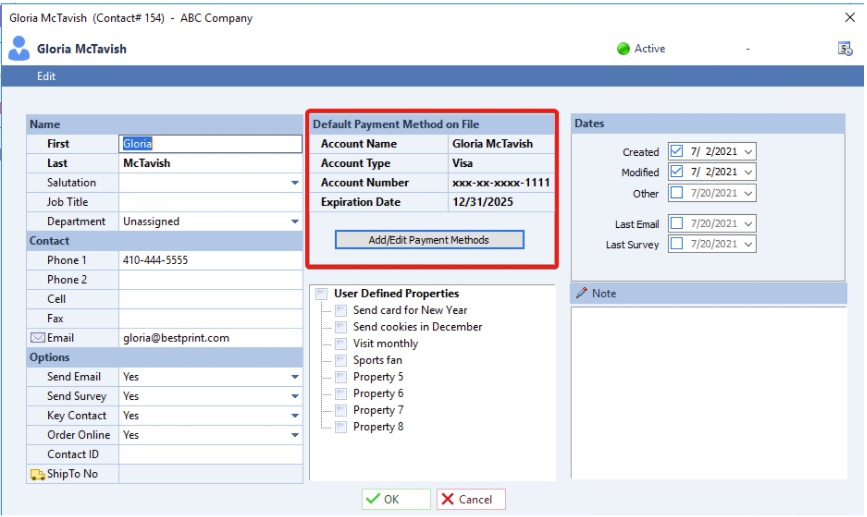
Clicking the Add/Edit Payment Methods button will open the Payment Methods window. This window displays each of the stored payment methods for that contact and has the following options:
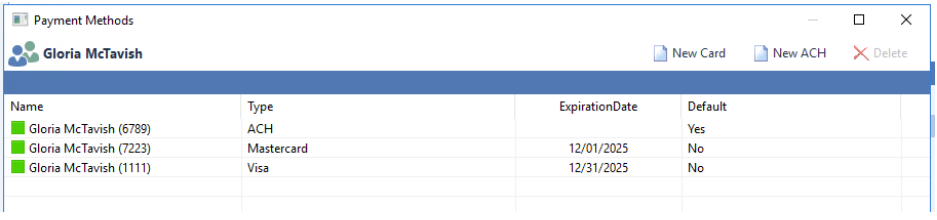
- New Card - Clicking this button allows the creation of a new credit card card on file for the selected contact.
- New ACH - Clicking this button allows the creation of a new ACH token on file for the selected contact.
- Delete - Clicking this button will delete the selected payment method.
- Right-Click/SetDefault - If you right click on a payment method a window will appear allowing you to set the selected payment method as the default option for the contact.
10. Payment Processing: Integrated Cloud Terminal
When processing a payment from Printer's Plan, you can now use a web based credit card terminal. Prior versions of Printer's Plan only integrated with a USB connected terminal.
In the Authorize Payment window there is a new option labeled Card Reader (Web), this field will allow you to select a web based credit card terminal to process a payment.
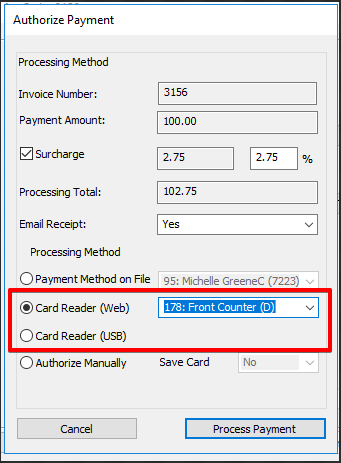
After selecting the card reader, and clicking the Process Payment button, a window will appear asking you to follow the instructions on the terminal device.

At this point, you will be able to process the transaction on the terminal. On a successful transaction, you can email, or print a copy of the receipt. To cancel a transaction click the Cancel button on the terminal device.
If you have multiple web-based terminal readers you can assign the default terminal for the workstation. To do this go to the Settings section, open the Print Reach Pay folder and select Payment Processing. In the window that appears, in the Workstation Default Card Reader field you can select the default reader:

For a listing of compatible card terminals please contact Print Reach at (888) 581-3211 or support@printreach.com
11. Updated Payment Details Window
The Payment Details window, which is used for entering credit card information, has been updated to include additional data fields. These fields are now pre-populated with data from the Customer/Contact and will be used to help ensure lower processing rates and greater success when processing a payment using an AMEX card.

12. New Icon to Indicate Card on File
When opening a Job, if the customer has a contact with a card on file the illuminated Print Reach Pay icon will be displayed at the top right corner.
If the customer does not have a contact with a card on file, the Print Reach Pay icon will be greyed out.
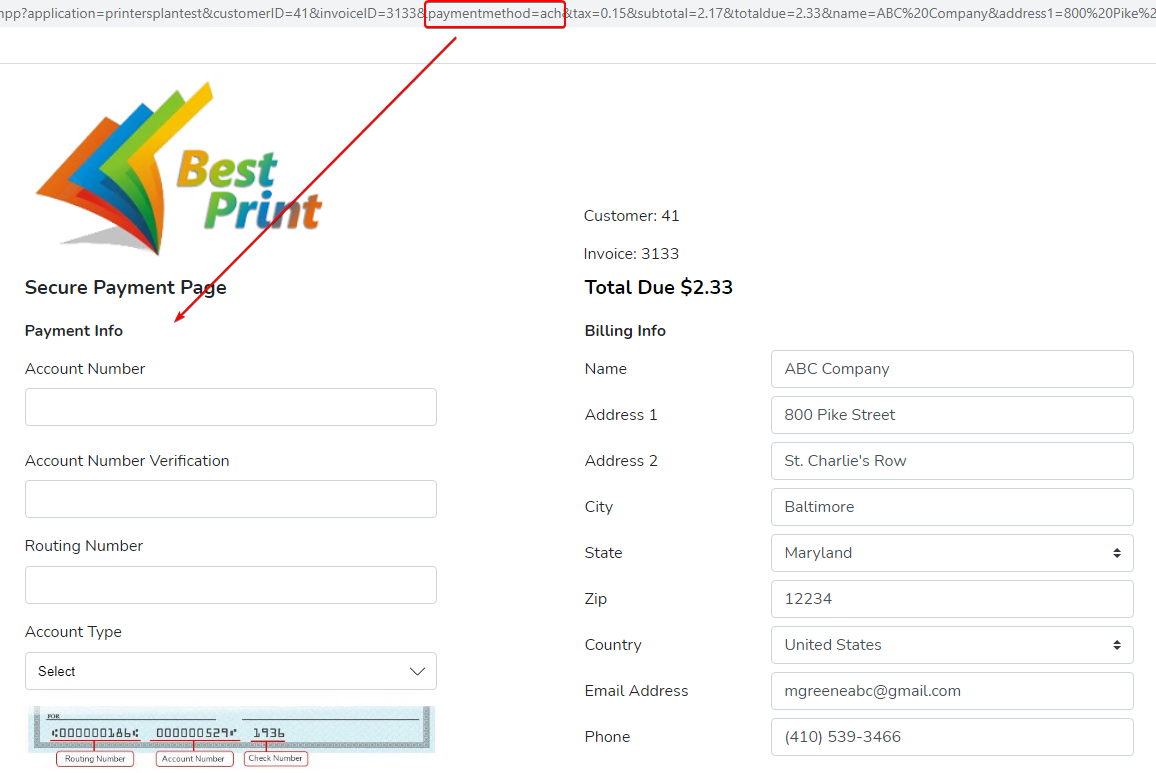
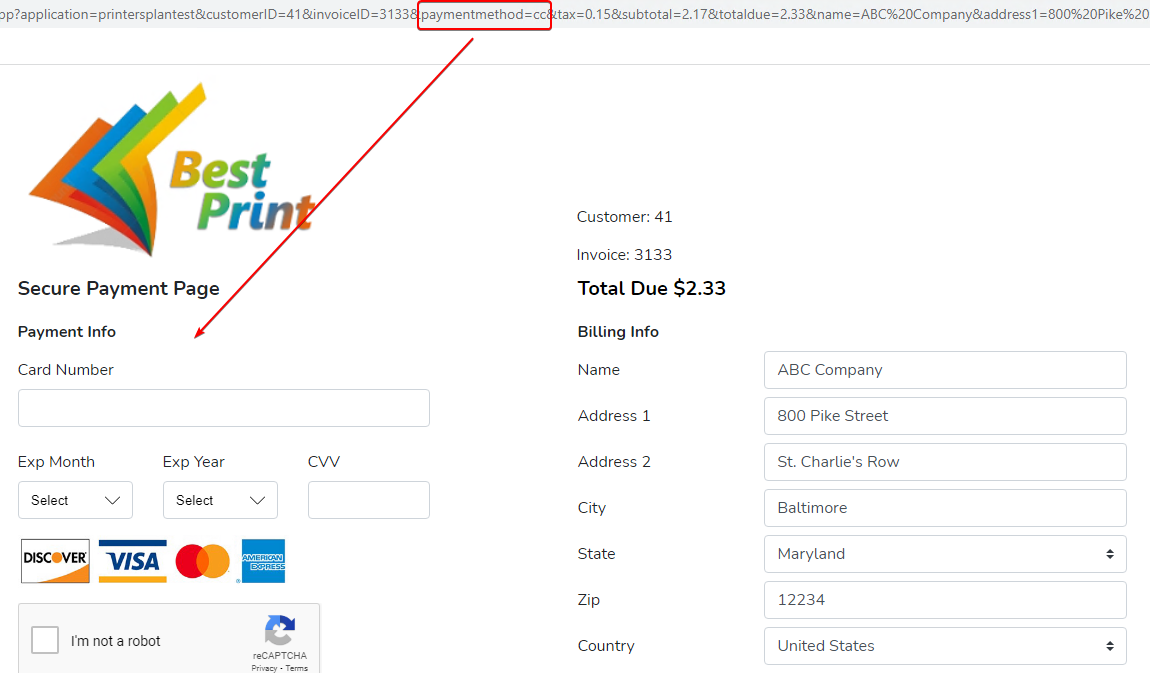
13. Preset Payment Method (ACH or Credit Card) on the Hosted Payment Page
On the Hosted Payment Page, you can now require a specific payment method (ACH or Credit Card). To implement this feature the following URL parameter needs to be included on the payment request link: [paymentmethod].
The paymentmethod parameter has the following options:
-
- paymentmethod=ach -- This parameter option only allows an ACH payment on the hosted payment page.
-
- paymentmethod=cc -- This parameter option only allows a Credit Card payment on the hosted payment page.
-
- paymentmethod=all -- This parameter option allows all payment method options on the hosted payment page.
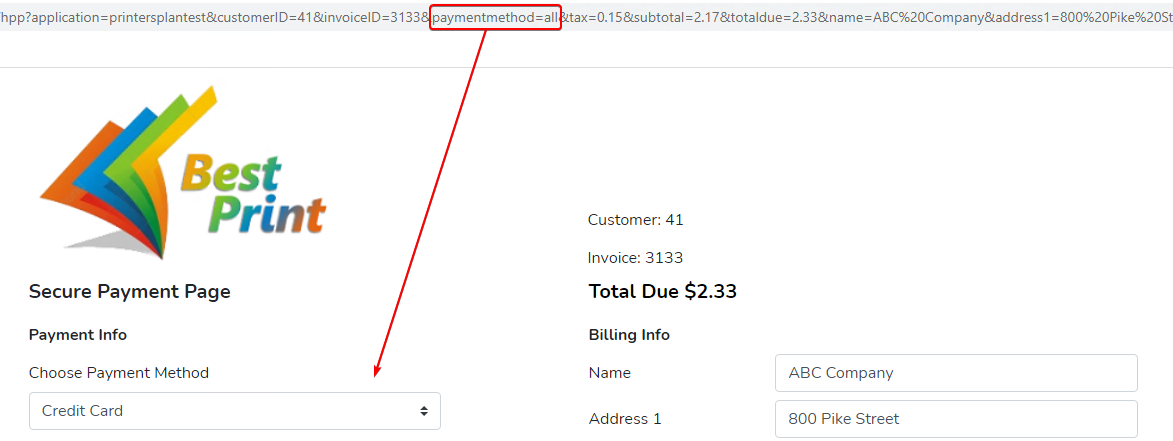
If the paymentmethod parameter is not included in the URL request then all available payment methods for the merchant will be listed.
14. Shipping Integration Enhancements:
- When sending shipment data to ShipStation, or ShipLeap, Printer’s Plan now includes the Purchase Order number as part of the data file. For ShipStation, the purchase order number is added to the <CustomField1> field of the output file. For ShipLeap, and other shipment providers, the purchase order number is added to the <PO> field of the output file.
- If a Shipping Method or Shipping Service contained the ® character this character caused an error when integrating with a third party shipping solution, this is now fixed and will no longer impact the integration.
- If a default shipping charge is automatically applied to a job, and the job is taxable, the tax amount on the job did not factor in the auto applied shipping amount. This is now fixed and only applies to cases where the tax record is set to charge taxes on shipping. This fix requires an updated version of the Printer's Plan API (dated 1/13/2022 and later).
- When sending a country code to ShipStation we now only send the first two characters (required by ShipStation).
- In isolated scenarios, the markup rate of a shipping charge caused the shipping amount field to save fractional cent values (example, $13.251), this is now fixed.
- In the Defaults/Third Party Integrations/Shipping window you can now do the following:
-
- Create multiple instances of an integration with a shipping vendor. Previously you could only configure a single integration per vendor.
- Customize the name of the shipping integration.
- Set the default Shipping Integration vendor on shipments for jobs originating from web orders.
-
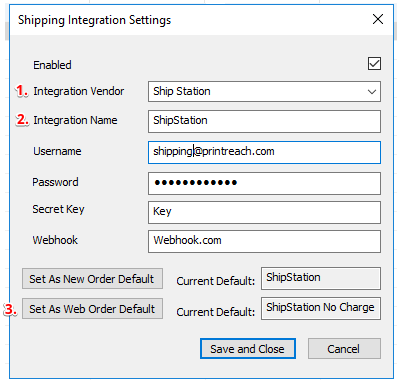
-
-
- Example use case for creating multiple integrations:
-
- Job A originates from your My Order Desk website and includes a shipping amount.
- Job B originates from Printer’s Plan and does not include shipping.
-
- Example use case for creating multiple integrations:
-
On both jobs shipment data is sent to ShipStation, for job A we do not want the shipping amount on the job to be updated. On job B we do want to update the shipping amount on the job. In both cases we want to capture the tracking number and shipping methods generated from ShipStation.
By having multiple integration options, and using the shipping configuration file, Printer’s Plan can automatically capture the desired results.
15. Fixes and Improvements
- On wide format jobs, if the document was two sided and printed using a single side of the material under specific conditions (usually an item quantity of 1) the total material length did not account for the second side, this is now fixed.
- In the Settings/Print Reach Pay/Payment Processing Settings window, the Default Processing Method field did not display the saved selection, this is now fixed.
- When reversing a Quick Sale Payment the Quick Sale transaction was not properly stored in the database, this is now fixed.
- When integrating with a Web2Print Site, in the <OrderRequestHeader> section of the cXML file Printer's Plan will now read the Extrinsic field BuyerInteropID to find the matching customer number. The format of this field would look like this: <Extrinsic name="BuyerInteropID">91</Extrinsic>
- When integrating with a Web2Print Site, in the <ItemDetail> section of the cXML file Printer's Plan will now read the Extrinsic field External Template to find the matching template - item number. The format of this field would look like this: <Extrinsic name="External Template">8-1</Extrinsic>
- When processing a non-taxed transaction using Print Reach Pay, the transaction request now includes additional data to ensure lower processing rates.
- When creating a large format item, if the quantity was set to zero and a roll material was selected the program crashed, this is now fixed.
- When tokenizing a credit card, or manually entering a credit card payment, the Name on Account field is now limited to 38 characters. This change will prevent transaction errors due to the field length of the account name.